In order to play a MIDI controller through a virtual instrument and have it feel responsive, the total latency (delay) between key press and sound typically needs to be 10ms or less, which is to say below the threshold at which we can detect it with our ears. Sometimes you can get away with up to 15ms, but by the time you hit 20ms or higher, you’ll likely hear the lag and it will be hard to play in time.
Some History
For many years and prior versions of Windows, even Windows 10, I found that achieving acceptable audio latency with a Digital Audio Workstation (DAW) or stand-alone synthesizer required ASIO drivers – which exist for most external audio interfaces but not for most on-board sound chips. No amount of settings fiddling got me the performance I wanted from on-board chips on Windows machines, so I just resigned myself to dragging around an external audio box whenever I needed to make music on the go with a Windows laptop. But no more!
I’m going to using my Surface Pro 4 as a specific example for each step, both because the latency issues of the on-board audio for Surface series in music-making is very well documented (via sites like surfaceproaudio.com) and because I love my Surface Pro 4 as a general-purpose device to take on the road. However, the general tricks here are applicable to any Windows 10 machine where the operating system version is up-to-date as of mid-2019.
This Tutorial a Nutshell
On a lot of newer machines with an up-to-date Windows 10 version, you can get surprisingly good performance out of WASAPI drivers, which every on-board sound device should have. You can do this as long as…
- Your computer is in high performance mode or equivalent and plugged in.
- You use exclusive mode in your DAW/synth with your sound device, which requires that…
- You don’t open any other sound-using programs, like web browsers. The solution here only works if you want to make music and just do that for a while – you can’t, for example, watch YouTube while composing on the same machine.
- Your DAW/synth permits you to adjust the latency settings in WASAPI mode. NOT ALL SOFTWARE ALLOWS THIS but most recent DAWs should. Standalone synth applications will be hit and miss for supporting the necessary settings. Bear in mind that some older programs don’t even support WASAPI at all.
Who this post is for: anyone with a relatively recent Windows 10 machine that is has run Windows Update as of mid-2019, particularly people with laptops who don’t want to cart an external audio interface around with them in order to run a DAW with a MIDI controller attached.
Who this post isn’t for: if you’re using an external audio interface with a desktop, you likely already have lovely low latency from ASIO drivers (although you might have to tweak their settings to get it) and don’t need to ever deal with WASAPI drivers. On the other hand, if your software doesn’t support WASAPI and you don’t have an ASIO-capable device, you need to use ASIO4All and can perhaps get some help from my post on Working with MIDI on Windows 10. In either case, this tutorial won’t help you much since it’s about WASAPI rather than ASIO.
But why not just use ASIO4All? If ASIO4All does what you need, great! But, it doesn’t work well on all machines, and when it doesn’t work it can be really unstable. ASIO4All unfortunately really doesn’t agree with my Surface Pro 4; I get loud bursts of static for no apparent reason and then it eventually crashes the machine. I’ve tried it many times with the same results even though some others have used it successfully; could just be the software I’m trying to use it with. ASIO4All also typically has the same only-one-audio-application limitation as my solution here. Because of that, for machines and software where the WASAPI solution works, I have found that using ASIO4All has no real benefits over the WASAPI method – and using WASAPI means one less installation.
Step 0: prerequisites
First, run Windows Update if you haven’t for a while. If you want to make your WASAPI drivers work better, you need to make sure your machine is up-to-date. I know everyone hates Windows updates, but WASAPI got a lot better in the last couple years. If you manually shut off updates a long time ago and have stubbornly stuck to being un-updated, this tutorial probably won’t work for you.
Next, check your startup list for any programs that use audio. This includes synths, but does NOT include virtual MIDI ports like Loopbe1 or LoopMIDI. MIDI and audio are two different things, and audio is the only one that matters here. Typically, any program that can use audio even it doesn’t make sound all the time needs to be disabled from the startup list. This includes web browsers.
Coolsoft Virtual MIDI Synth users: make sure that: (1) the program doesn’t start with Windows, which is a setting you can change within the synth’s configuration options, and (2) it isn’t enabled as an output in my DAW. Ensure both of those conditions are met, reboot, and then proceed with the next step.
And finally…reboot and then don’t open any programs until the instructions say so. Rebooting gets rid of any programs that would have a hold of your audio drivers. This is very important.
Step 1: put your machine into high performance mode (or equivalent).
First, plug your machine in. Don’t rely on battery power unless you have no other options. Typically running a DAW will drain your battery very fast.
Right clicking on the battery/power icon and bumping the slider up to “best performance” is enough on many machines, which is similar to what a “high performance” power plan used to look like in older versions of Windows. You can also go into the more advanced settings and max out performance options individually, but most people probably don’t need to do this.
If you don’t have a slider for your power settings, then you should have a high performance power plan somewhere. If even that is missing, try these instructions. However, the lack of a slider (which is a feature introduced relatively recently in Windows 10) may mean that your Windows version is also out of date or that more recent versions of Windows 10 aren’t supported on your hardware, which is a red flag that the rest of this tutorial might not work for you.
On the Surface Pro 4: being plugged in is a must, not just because of the battery drain – you just get a better result plugged in. I have found the slider to be sufficient when plugged in. Kicking the slider all the way to the right onto “best performance” was enough for me. If you have a Surface device and need help maxing out its performance potential, surfaceproaudio.com almost certainly has a tutorial to get you where you need to be with this step of the setup and to squeeze every last bit of potential out of the device.
Step 2: enable exclusive mode for your audio device.
Right click the speaker icon in the system tray (lower right corner), go to Sound Settings and then click on “Manage sound devices.” For the output device you want, click “Device properties” and then “Additional device properties.” Go to the Advanced tab and you’ll see two tick boxes under a category called “exclusive mode.” Make sure both are ticked! If they are grayed out, something has a hold of your audio device and isn’t letting go of it – check your startup list, reboot and try again.
On the Surface Pro 4: many people don’t realize that there are TWO DIFFERENT SOUND DEVICES on this device (and, to my understanding, other Surface devices). One is for the headphones, one is for the speakers. Most laptops don’t work like this and have a single device. I’m not really sure what the benefit is to having two separate devices, but that’s how the SP4 does it. Because there are two devices, you should make sure exclusive mode is fully enabled for both if you want to use both. However, generally it’s a good idea to focus to the headphone output when working on the Surface and not try to switch between the devices when your DAW is open.
Step 3: adjust the WASAPI settings within your DAW/synth.
Now, open your DAW or standalone synth – whichever one you are trying to configure.
In your DAW or standalone synth, look for driver options for your audio device. You should see an option for WASAPI if your machine and software are relatively recent. If you have the ability to adjust the latency of the WASAPI driver, you’ll see something like this (taken from REAPER, my DAW of choice currently):
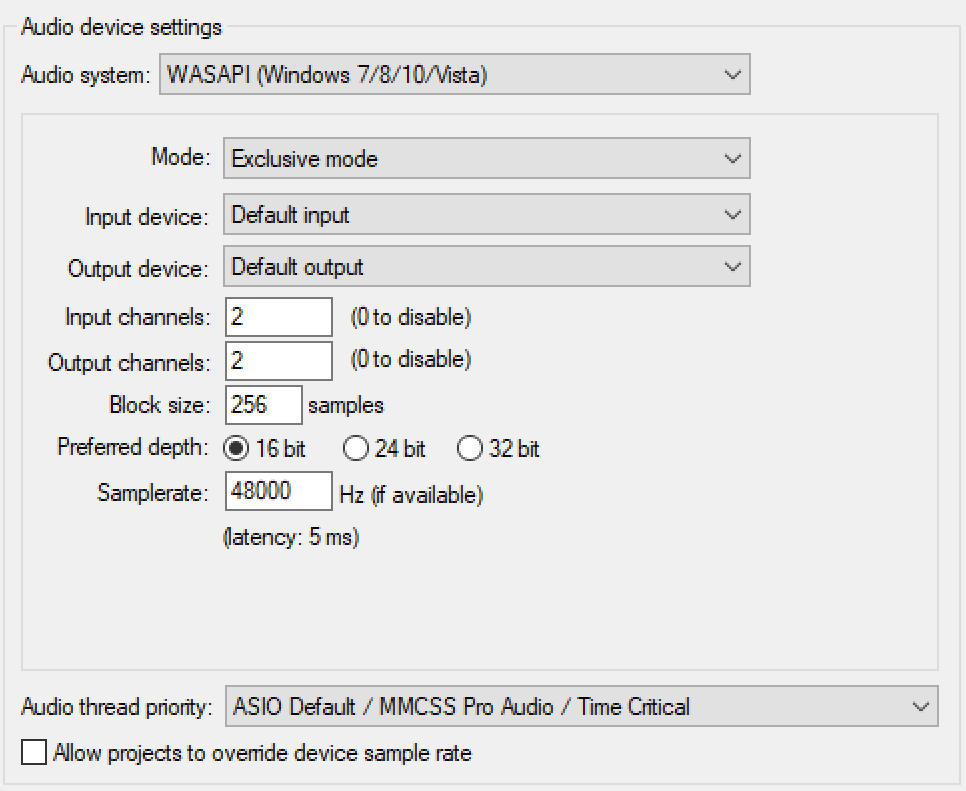
The important pieces to observe is that you have a way to select EXCLUSIVE MODE and you can change the BLOCK SIZE. A smaller block size results in a lower latency – but also means the machine may struggle to keep up with the demands of the audio stream. If the computer can’t keep up, you will hear clicks, pops, and other audible distortion. Sometimes those artifacts don’t show up until the computer is under strain with a lot of virtual instruments or effects, and some virtual instruments and effects are more prone to it than others due to the higher computational load they cause. Larger block sizes are “safer” in the sense that the outgoing audio is less likely to experience problems, but the lag between pressing a key on a MIDI controller and hearing sound will be greater. For listening purposes, that lag is not a problem – it’s only an issue when you need interaction.
Now, assuming you have the ability to play with the latency settings, this is where the experimentation starts. Lower the latency to somewhere in the range of 5ms and see what happens. If you get a lot of pops or other glitches, try going up to around 7-8ms and then 10ms. Even if it has to go up to around 12ms before the pops are gone, you’re probably ok. The easiest way to ensure that you’ve got a good setting is to load up a project that is roughly representative of the kind of virtual instrument load you use and then try to record new tracks on top with the settings as you experiment. Otherwise, it is possible to have a setting that has extremely low latency with one instrument that starts to crackle and pop under a higher instrument load as you build your music.
Good practice for sampling rates: it’s a good idea to make sure the sampling rate matches your audio device’s defaults in the Windows settings. This typically means picking either 44.1khz or 48khz and sticking with it. If you change the sampling rate in the Windows settings, it’s a good idea to also change the settings in your DAW and then, most importantly, reboot before doing anything further. Weird stuff can happen on some machines if the two settings aren’t in agreement at boot time.
Good practice for thread priority: max it out if you have the option too. It’s set to the highest possible in the example above. Not all software has this option, and when it does it’s usually set to a relatively high priority by default, but it’s worth checking if it can be boosted even more in the options that your program has.
Remember the following:
- Your mileage may vary. Sample-based or wavetable synthesizers will perform better than those doing a heavier workload (like tons of additive/subtractive synthesis with a bunch of individual oscillators and filters). Some synths also just run more efficiently than others. The same goes for effects. If you really like to pack on the VSTs in your work and don’t like to render parts to fixed audio along the way, you may bump into the limits of what your device is capable of. This can be true even when using an external audio interface with nice ASIO drivers.
- Stick to your DAW and don’t open other programs! If you open a browser, depending on how your DAW works you may lose your audio and get audio device errors popping up. In a worst case, other programs might not let go of the audio drivers when you close them, and you might need to sign out and sign in again or even reboot before you can use exclusive mode again. Using the methods I’ve described here, you really need to just focus on your music – leave the emailing and other distractions until later!
On the Surface Pro 4: I’ve actually found that the 256 block size, 5ms latency mode works really well. Of course, I often only compose with a handful of VSTs at any given time and don’t use long effects chains. I’ve found that using MIDI polyphonic expression (MPE) devices/synths like ROLI controllers and the corresponding Equator VST are a much higher burden than something like Kontakt with its various factory library instruments. So, sometimes I have to go up to a higher block size and hover around 10-12ms – which still works fine and has a good feel to it for my purposes.
Troubleshooting
The only way I can get rid of audio glitches is to make the latency too high to be useful!
First, make sure you’re plugged in and that you’ve maxed out the performance options in the power settings for your machine. If your machine is running at full blast, getting hot, and still giving you audio performance issues, it may be that your hardware is simply isn’t up to what you’re trying to make it do. If you have less than 8gb memory or an old/slow CPU, particularly if it only has a single core, you might be out of luck for the approach described on this page. Working with real-time audio in a DAW is a fairly demanding task for a computer. You can give ASIO4All a try, but you might need a separate audio interface or even a more powerful or newer machine.
I got audio device errors when I tried to use exclusive mode!
This means something else is trying to use your audio device. Exclusive means exactly what it says – one application gets exclusive access. If another program that can use audio is open, like a web browser, exclusive usage isn’t possible. Close all other programs and try again. If you still get errors, reboot, and try again without opening any other applications. You may need to check your startup list and disable anything that is non-essential.
What if I don’t have the exclusive mode or block size options?
First, reboot and then open the same program first – don’t open anything else. See if the options are still missing or if they magically appeared. Sometimes, if the audio device is already in use by another application, exclusive mode won’t even show up as an option. Some applications are also bad about releasing the audio device, meaning that if they’ve even been open once since startup the audio driver won’t go back to being completely free.
I tried everything but still don’t have exlusive mode and/or block size options!
Well, if you don’t have the ability to select exclusive mode at all, you’re probably out of luck, since exclusive mode is a key part of getting better performance. If this is the case, your best bet is using ASIO4All. If you can set exclusive mode but can’t adjust the block size, you may see a bit better performance than with shared mode but it likely won’t be as good as if you can adjust the block size too.
I don’t even have a WASAPI option! What can I do?
There are only two options if your software has no support for WASAPI: (1) use ASIO4All or (2) buy a sound card or external audio interface that comes with ASIO drivers. This tutorial is only for WASAPI and a lot of older music software for Windows (particularly pre-Win10) had a hard requirement for ASIO drivers. In these cases, ASIO4All is the only way to get lower latency audio performance without buying a separate sound card or AUDIO interface that has its own ASIO drivers and the performance might not be that great even with ASIO4All. Typically there was an expectation in older software that a dedicated sound card or audio interface would be used.
Hi Donya,
Thanks for the detailed article! I didn’t know that WASAPI can be tweaked for low latency and was struggling with poor ASIO drivers for the devices I have. But when I stumbled on the article, I made some more exploration of the topic.
I use Voicemeeter and it lets using WASAPI devices even with the older software, that requires ASIO, via Voicemeeter’s virtual input. Even with this added step and without the exclusive mode, I get latency <10 ms with block size of 256 (it's is not calculated, but it feels latency-free).
I wanted to thank you for this. I’ve also had great experience with WASAPI. Your write-up is excellent.
You are 100% correct about ASIO4ALL! I’ve had issues with stability, performance, and it also has a hideous interface that is torture to use. It’s also not being maintained — the current version is more than 3 years old.
I especially dislike hardware and software that claim ASIO support when that means they expect you to use ASIO4ALL. (Behringer’s audio interfaces, for example, as opposed to, say, Native Instruments and Focusrite, which have their own excellent ASIO drivers.)
I dislike software that claims Windows 10 compatibility but doesn’t support WASAPI (Ableton Live, Max.)
My home music studio uses a Focusrite Scarlet with its own excellent ASIO driver. But I also like to work portably (I have a Surface Book 2 15″ and a Surface Go 2) and don’t want to haul around a physical interface. I get excellent low latency performance with WASAPI that allows me to perform without a physical interface, even on the little Go 2.
Anyway, thanks again. I was glad to see such a well-informed and helpful article about Windows sound! I looked at your “about me” page and will check out some of your projects which look really fascinating.
Thank you so much! I can finally use amp sims and play VST synths.
Hi Donya, what an absolutely brilliant post. I’ve been struggling for days with my new setup and wondering why I can’t get asio4all to work well on my new laptop when it used to work very well on my old desktop. I’ve followed everything in the post and I’ve now got everything running as near perfect as possible with 5.3 latency. That’s the best I’ve ever had. Thank you so much for this.
If you want use two focusrite in the same time the only way is wasapi. Asio support only one device at time..