Last modified:
I’ve had a long-standing problem in my work: the need to be able to record from multiple devices simultaneously on a laptop. For example, because I’m a computer music researcher, I will often be in a meeting over Skype and need to be able to demonstrate audio on my system for the person I’m talking to. That means I need to record from two things: (1) my microphone and (2) a “what you hear” sort of audio device that lets me send my computer’s sound to some other program. This page is my attempt to formalize the best solutions I recently found for this problem on Mac and Windows. The instructions here are subject to change over time.
Most other solutions I’ve read about and tried to this problem are rather imperfect, because they result in a delayed version of your voice coming back through your headphones. If you have ever experienced an audio feedback problem on Skype due to someone not using headphones and having the laptop screen angled too far forward, you will be familiar with how hard it is to talk normally with that happening. Fortunately, it’s possible to avoid this problem, and to do it without buying a bunch of expensive stuff.
For these instructions, I am assuming you are using headphones to avoid feedback between the microphone and your computer’s speakers. Although it is possible to have a headphones-less setup with speakers that do not cause feedback into the microphone, it typically requires high-end equipment, specifically a strongly directional microphone (which laptop microphones generally are not!) and speakers that are set quite a ways behind the mic rather than in front of it as is the case for laptops.
Mac (OS X)
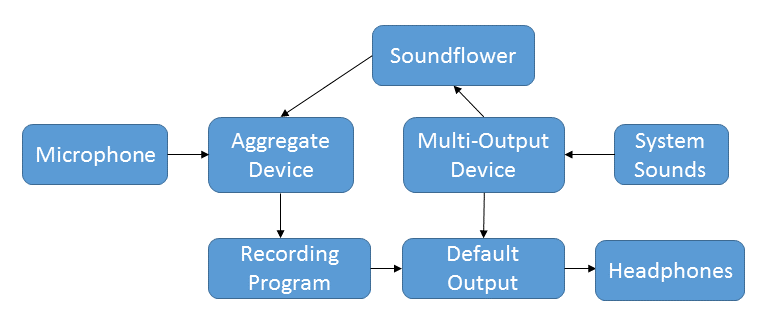
These steps will let you record audio from a microphone and “what you hear” on a Mac with programs like Skype and Audacity. These instructions are based on my experience setting this up on OS X version 10.10. This is the goal for the audio configuration that the instructions below describe:
Setup instructions:
- Install Soundflower (freeware).
- CLOSE EVERYTHING. Any program making use of sound needs to be fully exited, not just minimized. Otherwise, changes in your audio devices may be ignored or your audio may quit working altogether. You need to manually quit programs like Audacity and Skype. Do not restart them until after you are done setting up. Systems settings also must be closed; don’t open it again until it is mentioned in the instructions.
- Set your headphones volume the way you want it before you continue. You are about to give up the ability to change it with the volume buttons on your keyboard in exchange for the ability to record two things at once.
- Open the Audio MIDI Setup program. You may need to go to Window > Show Audio Devices.
- Click on the “+” in the bottom left corner of the window.
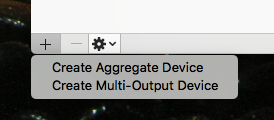
- Select “Create Aggregate Device.”
- Click the “+” again and select “Create Multi-Output Device.”
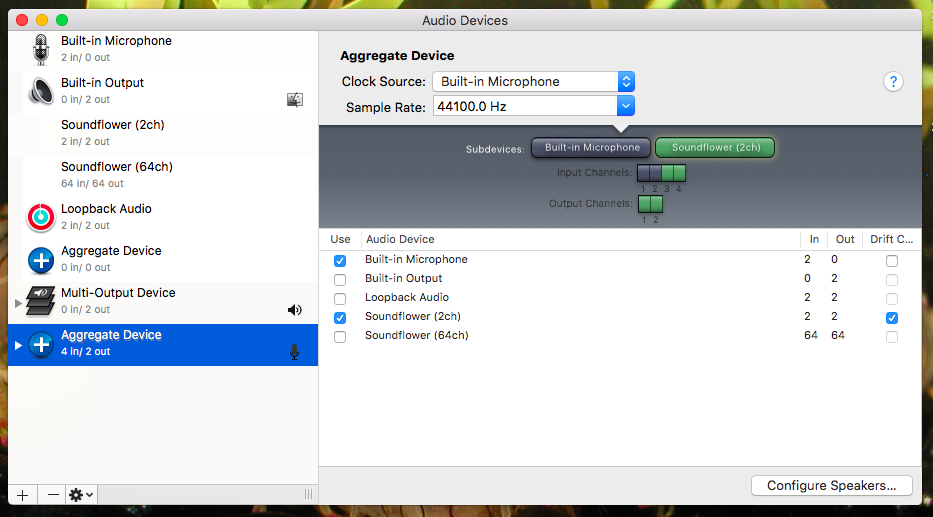
- Configure your Aggregate Device to receive from the microphone and Soundflower (2ch).
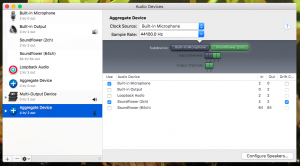
- Configure for Multi-Output Device to send to the built-in output and Soundflower (2ch).

- Ctrl+click on the Aggregate Device and select “use this device for sound input.”
- Ctrl+click on the Mutli-Output Device and select “use this device for sound output.”
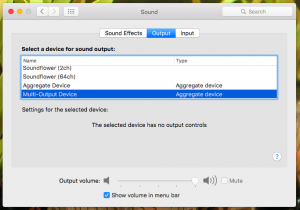
- Click on the Apple icon in the top left of the screen and go to System Preferences > Sound.
- Click on the Output tab and then select the Multi-Output Device from the list if it isn’t already highlighted. (Note: when you are done recording, you can simply go back to your regular output device to regain easy control of the main output volume.)
- Click on the Input tab and then select the Aggregate Device from the list if it isn’t already highlighted.

- While viewing the Input tab, make some noise on the microphone and on whatever program is connected to Soundflower to verify that the volume meter responds appropriately. You should see the volume meter respond clearly to both sources.
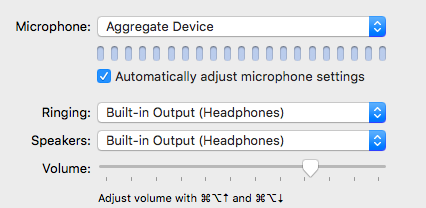
- Set your recording program to take input from the Aggregate Device. This may mean setting the Aggregate Device as the “microphone.” Here are some examples of what that looks like, one from Skype and the other from Audacity. Note that audacity requires 4 channels of input for this.

Skype settings. 
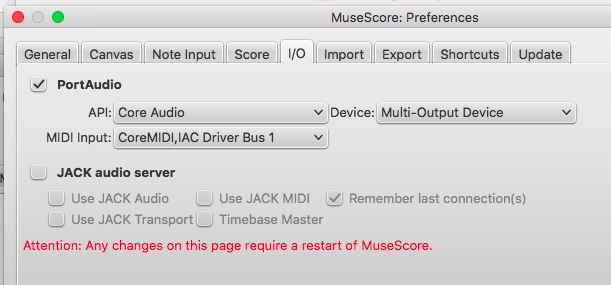
Audacity settings. - Many use cases will be done at this point. However, if a program whose sound you want recorded allows customizing the output audio device, you may need to change the program’s output settings manually to use the Multi-Output Device you created. MuseScore is one such example, since it may not automatically change its output audio device when you change the system settings (you must also quit and restart MuseScore for any output settings changes to take effect).
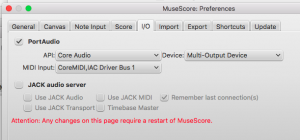
MuseScore settings under Preferences > IO.


Troubleshooting:
- If you only hear one of the two input devices, there are two main possibilities:
- The volume of one of the devices is set too low, or the other is too high and drowning it out. Check the volume levels in Audio MIDI Setup. You can also control them by selecting the device in the System Preferences > Sound, but make sure you re-select the correct device afterwards for input and output.
- Your recording program may not be mixing down input from both devices. Some software, like Skype, are able to mix down the channels automatically to combine the respective left and right channels. Other programs, like Audacity, require you to record 4 separate channels of input. Which device gets the first stereo pair is based on the order in which you added them to the Aggregate Device for input.
- If your sound suddenly stops working, try quitting your sound-related applications, check that all of your settings match these instructions, and opening your programs again. If it’s still a problem, reboot. You can also try deleting both of your aggregate devices (the aggregate input and the multi-output) and rebuilding them again. You can delete aggregate devices using the “-” button right next to the “+” button that allows you to add a device in Audio MIDI Setup.
Windows
These instructions are for Windows 10. Roughly the same thing can be done on Windows Vista, 7 and 8, but not earlier versions of Windows. This is the general goal for the setup:
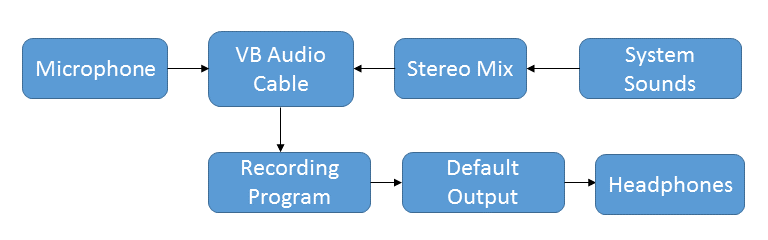
Note: very rarely, there a recording device that is literally called “what you hear.” If you have this, use it wherever I refer to “stereo mix” in the instructions below.
Software-Only Setup
- Install VB Audio Cable (donationware). You must run the installer as an administrator.
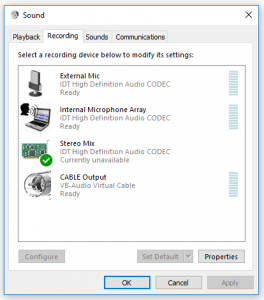
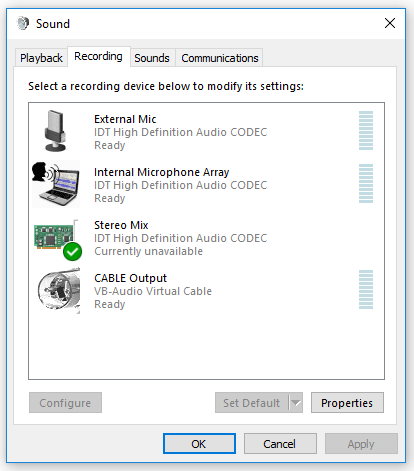
- Get your Stereo Mix audio device working. Right click on the volume icon and go to “recording devices.” If you see a device called “Stereo Mix,” make sure it is enabled and proceed with the rest of the setup. This is an example of what I see on my laptop. Your exact device list may be different.
If you don’t see the device, it’s either because it is hidden or, on some systems, it doesn’t exist (usually due to driver problems that are possible to correct). You must have a stereo mix option to make this particular setup strategy work. Try the following if there is no such device listed:- Right click anywhere on the list of recording devices and select “show disabled devices.” If stereo mix pops up, right click it, select “enable,” and proceed with the rest of the setup.
- If stereo mix isn’t a hidden device, it means your current audio driver doesn’t support it. Most on-board sound chips have a driver that supports a stereo mix recording device, but many external devices do not. You may need to do some research on getting a driver for your sound chip that supports the stereo mix option. It’s not always a matter of updating it – sometimes you have to get an older version, particularly if your computer is old and was upgraded to a newer version of Windows and a generic Microsoft driver was installed instead. On one of my machines, an HP laptop that started out as Windows 8, I had to uninstall the driver that came with Windows 10 and re-install the original HP audio driver for Windows 8. There are too many troubleshooting possibilities for me to list them all here; you will have to resort to Google.
- If the device is enabled but unavailable, it may be to do with your microphone settings. Some machines only allow stereo mix to run when a particular microphone is selected. If there are two, usually a built-in mic and a line-in mic, try disabling the line-in mic. If you are in this situation, you may stuck with using the built-in mic as your only microphone option.
- If all of the above failed for you, give Stereo Mix Plus a try (a piece of software recommended to me by someone who ran into this problem). Stereo Mix Plus is a program that adds Stereo Mix functionality to arbitrary sound cards and chips that otherwise do have the feature built-in.
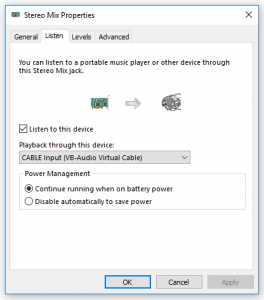
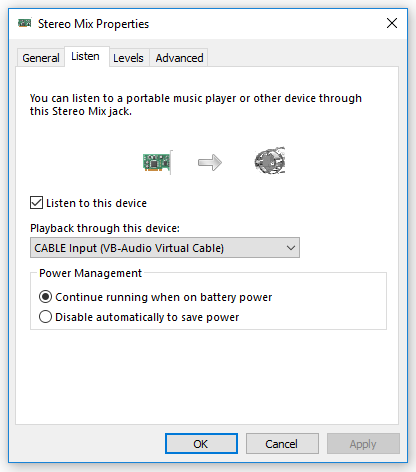
- Right-click on stereo mix and go to Properties > Listen. Check the “listen to this device” box and have it send to “CABLE Input” (which is VB audio cable). Click “apply” and “ok.” This is an example of what the Listen tab for a particular recording device looks like.
- Right-click your microphone (whichever one is left enabled if there are two) and go to Properties > Listen. Check the “listen to this device” box and have it send to “CABLE Input.” Click “apply” and “ok.”
- Select the CABLE Output device from the list of recording devices and click “set default.”
- Check your playback devices and make sure that your speakers/headphones are the default output device. Importantly, do NOT set CABLE Input as the default output device. You must use some device other than VB audio cable’s device.
- Set your recording program to take input from “CABLE Output” (VB audio cable) and send output to your default output device.
Using an External Audio Interface
If you are using an external audio interface, odds are that you won’t have an equivalent to stereo mix for it. Some mid- to high-end interfaces have a “software return” that is the essentially same thing, but interfaces intended just for portability and listening (rather than serious recording) are not likely to support such a feature. You have a couple of options if you need to use your external audio interface rather than relying on your built-in sound chip:
- If your audio interface has at least one stereo output and a stereo line in in addition to a headphones port, use a physical cable (or two if it’s paired RCA or TS) to rout the output into the line-in and then make sure that the device has live monitoring of input turned off. You can then do the same thing described for the software-only method, but using your audio interface’s recording device in place of the stereo mix device.
- If you have output ports in addition to a headphones port, use a physical cable to connect them to the line-in microphone port on your computer. If your laptop allows the built-in and line-in microphone devices to be active at the same time, you can enable both and have them both listened to and sending to VB Cable as in the software-only instructions.
These approaches would, I think, also work if you have a USB microphone in addition to the audio interface – but treating the USB mic’s device like the built-in one when setting up which devices are listened to and sent to VB cable. However, I have not tested this strategy with a USB mic myself yet.
Thanks for a clear, detailed explanation. The diagram for the Mac setup is just what I needed.